Editing DPCM Samples
DPCM (Delta Pulse Code Modulation) samples are 1-bit digital samples that the NES/Famicom supports. They are of very low quality but have been used quite successfully for drums and basses.
To use a DPCM sample, it first needs to be loaded, then it needs to be assigned to a key of the piano of a specific instrument. To edit the key/sample assignments of an instrument, click the little "sample" (rightmost) icon next to an instrument.
Prior to FamiStudio 4.1.0, only a special "DPCM Instrument" could hold samples in that way. This is no longer the case, any non-expansion intrument can now hold samples.
The samples workflow in FamiStudio is lossless in a way that once a sample is imported, any modification done to it will not modify the source data. Every time a parameter is changed, the source data will be re-processed to generate the final sample.
This short 6 minutes tutorial will teach you the general workflow of DPCM samples in FamiStudio.
This second tutorial is more advanced and will teach you how to sample instruments and dealing with looping samples.
If you do not wish to use the built-in DPCM sample editor of FamiStudio there are many other alternative : FamiTracker, RJDMC and MakeDPCM.
Loading DPCM Samples
Samples are loaded by clicking the little folder icon next to the "DPCM Samples" section in the project explorer. FamiStudio can import samples from WAV files or from a DMC files. Note that importing DMC files and doing extensive processing is not recommended as these samples are very low-quality to begin with and any extra processing will degrade it further.
It is also possible to import samples from another FamiStudio project. Note that doing this will not import the sample assignments to keys of the piano or any instrument information. To import those as well, you maybe want to import the whole instrument instrument in the Instrument section of the Project Explorer. This will import all the piano/key assignments, as well as the used samples.
Once loaded, you can rename a sample or change its color by clicking the gear icon (or double-clicking on it)button. You can also play the sample by clicking the little play button next to it:
- Left-clicking will play the processed sample.
- Right-clicking will play the source sample (DMC or WAV).

Modifying DPCM Samples
Once a sample is loaded, it can be expanded by clicking the little arrow to reveal some of its properties.

-
Preview Rate : Rate at which to preview the sample when pressing the little Play button. It has no impact on the processing of the sample. These sample rates are the sample rates supported by the NES/Famicom and are the same as when you assign a sample to a key of the piano. These will change slighting depending if you are playing back in NTSC or PAL mode.
-
Sample Rate : Rate at which to re-sample the sample. This can be useful to lower the size of the final sample, but will also degrade the quality significantly. To keep the pitch consistent, you probably should adjust the preview rate to match the sample rate.
-
Padding Mode : Affects how the final size of the sample is calculated:
-
Unpadded : The sample will be unpadded.
-
Pad to 16 : The sample will be padded with silence until a multiple of 16 bytes is reached. This is what most games did and will cause an extra byte of garbage to be played every time the sample is played, but this is usually not audible.
-
Pad to 16 + 1 : The sample will be padded with silence until a multiple of 16 bytes (plus one) is reached. This is technically the best way to process samples and it will ensure that no extra garbage sample is played but will waste 15 bytes.
-
Round to 16 : The sample will be resampled in a way that the end of sample aligned to 16 bytes. This may affect the pitch slightly. This will cause an extra byte of garbage to be played every time the sample is played, but this is usually not audible.
-
Round to 16 + 1 : The sample will be resampled in a way that the end of sample aligned to 16 bytes (plus one). This may affect the pitch slightly. This is a good mode to create looping samples.
-
Trim to 16 : The sample will be aligned to a multiple of 16 bytes. Any remaining bytes from a multiple of 16 will be trimmed. One extra byte of garbage will play every time the sample is played, but this is usually not audible.
-
Trim to 16 + 1 : The sample will be aligned to a multiple of 16 bytes (plus one). Any remaining bytes from a multiple of 16 will be trimmed. One extra byte will be added to prevent playing a byte of garbage, but it will waste 15 bytes.
-
-
DMC Initial Value : Initial value of the DMC counter (0-63, values are actually 1/2 of what the hardware uses). This can be tweaked to that the first value matches the initial value of the WAV file, or to off the entire DMC data as a whole.
-
Volume Adjust : Global volume adjustment, from 0% to 200%.
-
Fine Tuning : Fine adjustment to the pitch, from 95% to 105%. Useful to adjust samples that are out of tune.
-
Process as PAL : Perform all resampling/processing using PAL sample rates.
-
Trim Zero Volume : Remove leading/trailing parts of the waveform that have near-zero volume.
-
Reverse Bits : This option is only enabled when the source data is a DMC file. Will reverse the bits of each byte. This can be used correct problem is some existing games where samples were packed backwards.
Editing DPCM Waveform
Waveform overview
Clicking on the waveform icon next to a sample will reveal its waveform in the piano roll.
- The source sample is display in gray
- The processed sample is display in the color of the sample
The color of in the header will also show the length of the processed sample, which may be shorter than the source.

Selecting and deleting samples
Zooming in will reveal the individual samples of both waveforms. It is possible to select samples of the source data to trim them (by pressing the Delete key). Note that deleting samples manually is the only destructive operation that you can perform on the source data.

Adjusting volume with the volume envelope
Much like when editing notes, the effect panel can be expanded by clicking the little arrow in the upper left corner of the piano roll. This will reveal the 4-point volume envelope which can be used to adjust the volume of sample with more precision.

The center line represents 100% volume which the bottom and top represent 0% and 200% respectively. You can drag the envelope points by left clicking and dragging them. Note that the first and last vertex will always be at the beginning and end of the sample. Right-clicking on a vertex will reset its volume to 100%.
This is especially powerful when combined with the "Trim Zero Volume" option. For example, in the example above, the sample is made a lot shorter (and smaller) without deleting anything from the source data by reducing the volume to zero and letting FamiStudio trim the part with zero volume.
Exporting DPCM samples
Clicking on the little disk icon in the Project Explorer allows you to export a sample. Both the source and processed data can be exported.
- Left-clicking will export the processed sample as a DMC file.
- Right-clicking will export the source data (in its original format, WAV or DMC)
Assigning a DPCM sample to an instrument
Once a sample is loaded, it can be assign to a key of an instrument.
Prior to FamiStudio 4.1.0, only a special "DPCM Instrument" could hold samples in that way. This is no longer the case, any non-expansion intrument can now hold samples.
Clicking on the little "sample" (rightmost) icon next to the a non-expansion instrument in the project explorer will open the piano roll in DPCM edition mode.

Samples can be assign to a key in 2 ways:
- Click in the piano roll will prompt you to select sample
- Dragging a sample from the Project Explorer will allow you to place it anywhere on the keyboard
Unassigning a DPCM sample
Right clicking on a sample that has been mapped to a key will remove it from that key. The memory for a sample will not be freed if it is still being used by another key.
Moving DPCM samples to another key
DPCM samples can be dragged to another key. When the drag is completed, FamiStudio will offer you to transpose all notes using the old key to the new key.
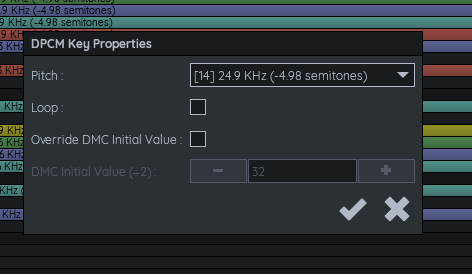
Editing DPCM samples properties
Double-clicking on an existing sample will show its properties. These are the property of the assignment of the sample to this key, not of the sample itself (the same sample can be used at different pitch, for example).
- Pitch : Allows pitching the sample down. These pitch values are the sample rates that the NES/Famicom supports and will sound a bit different on NTSC or PAL.
- Loop : Makes the sample loop or not.
Sampling Instruments
Contribution by .Hayabusa, thanks!
If you want to sample some instrument, for example the Sunsoft Bass on your own, you can try this method. This is the same technique that was used in Sunsoft games.
-
All you need to have is 5 different samples of same instrument, those samples should play these notes : A#, B, C, C#, D. These samples should be relatively high-pitched, since we will be pitching these down. Also this will help keeping the size down.
-
Assign those 5 samples to corresponding notes, furthermore you will use these samples on lower notes, by assigning each one with lower pitch, to it's corresponding notes. For example let's take first source sample, A#, which with pitch 15, which is, of course the same A#. If you will lower the pitch to 14, it will become note F. With pitch 13, it will become D. And you will assign this same sample, by lowering pitch like that to it's corresponding notes.
Here is a chart of how many semitones it goes down by decreasing the pitch, currently as i write this, i only got to pitch 7, which is -24 semitones, so in theory, you can sample whole 2 octaves by using just 5 samples.
| Pitch | Semitones (approximate) |
|---|---|
| 15 | 0 |
| 14 | -5 |
| 13 | -8 |
| 12 | -12 |
| 11 | -15 |
| 10 | -17 |
| 9 | -19 |
| 8 | -22 |
| 7 | -24 |
Here is a spreadsheet of which is the best sample (A#, B, C, C# or D) and the best pitch (0-15) to use to cover the entire keyboard while keeping things in tune. Note that this was generated for NTSC only. Please get in touch with me for a PAL version.
