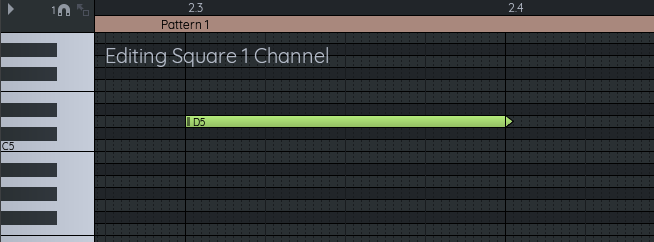
Editing Notes
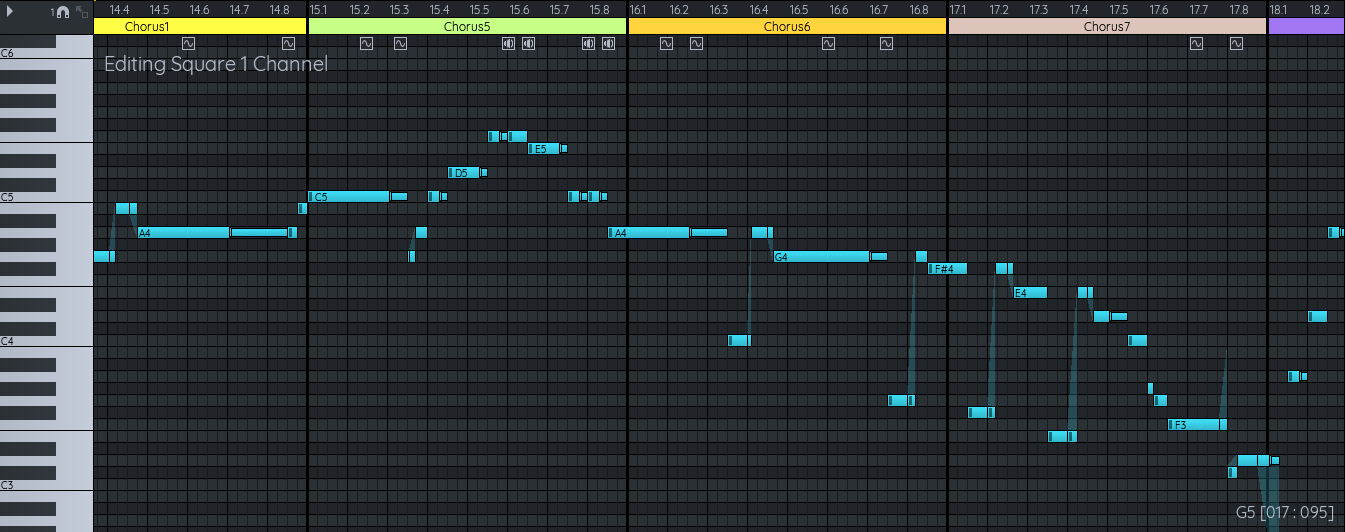
The Piano Roll is where you editing the actual notes of the song, the instrument envelopes, as well as some special effects.
You can also use it to preview instrument by clicking on the piano. The currently selected instrument (in bold in the project explorer) will play on the currently selected channel (in bold in the sequencer).
Subdivision
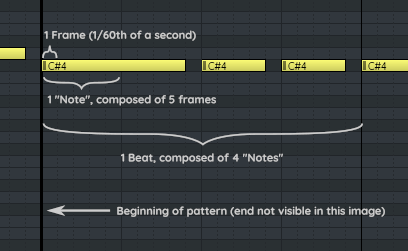
Horizontal lines in the piano rolls are aligned with the notes of the piano. The vertical lines represent multiple levels of subdivision:
- Thin dashes gray lines separate individual frames (1/60th of a sec in NTSC, 1/50th in PAL) (FamiStudio tempo mode only)
- Thin gray lines separate notes
- Thin black lines separate beats
- Thick black lines separate patterns
In FamiTracker tempo mode, you do not have access to the individual frames, so the dashes lines will not be visible.
For more information about tempo, please refer to this section.
Seeking
Clicking in the timeline (header) of the piano roll will move the play position. You can also drag the seek back to move it more accurately.
Adding & deleting notes
Clicking a pattern in the sequencer will scroll the piano roll to its location.
On desktop, Left-clicking in the piano roll will add a note of the currently selected instrument and dragging while still holding the left button will allow you to set the duration. A pattern may be automatically created if you click on an area where there was no pattern. Double-clicking deletes a note. Alternatively Shift+click also deletes.
Another way to delete multiple notes is to use the Eraser Mode which is accessed by simply holding and dragging the mouse after a Double-clicking or a Shift+click. The cursor will turn into a pencil eraser, allowing you to quickly delete notes.

Similarly, on mobile, notes are created by a quick tap.

You can delete a single notes by double-tapping on it. Eraser Mode is activated by double-tapping, holding (like a long press) and then dragging your finger once you get the prompt and see the white circle around your finger.
Moving & resizing notes
When moving the mouse around the piano roll, the note under the mouse cursor will be highlighted and the mouse cursor will change to reflect the type of action you can do :
Possible actions are:
- Move one or multiple note(s)
- Resize one or multiple note(s)
- Move the release point of one or multiple note(s)
On mobile, notes must be first given a white highlight by tapping once before being edited. Only they have that, you can move them or resize them.

Quickly duplicating Notes
On desktop, one way to quickly duplicate notes is to hold Ctrl while dragging a selection. It will duplicate the select and allow you to place the new notes where you want.

Another way to achieve similar result is to use special paste with the "Repeat" option.
Note duration & priority
FamiStudio is a monophonic app, in other words, only one note can play at a time on a given channel.
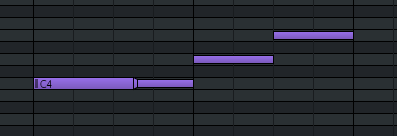
The general rule is that the latest/newest note (the one that is rightmost on the timeline) always has priority, this mean that it can interrupt a previous note, making it shorter than it would normally be.
As you can see, in the following example, even through i am trying to resize the left note, I cannot go beyond the right note. If I move the right now back, it is still interrupting the left note. Only when I move the right now far enough to the right we can see the real duration of the left note.
Selecting notes
There are three main ways of selecting notes, selected notes will appear with a thick silver border.
- You can select notes by right-clicking and dragging in the header of the piano roll or anywhere in the background of the piano roll (where there is no note).
- You can select the duration of a note using the context menu that appears if you right-click above or below a note.
- You can select an entire pattern or an entire song using the context menu that appears when you right-click on the header.
The following images shows all 3 techniques.
Once notes are selected, then can be moved or resized all at once. They can also be moved or transposed using the keyboard array keys (up, down, left and right). Holding Ctrl while doing so will make the notes move by larger increments.
On mobile, there is just only way to select notes and it is done by swiping in the header of the piano roll. A long press in the background will allow you to clear the selection.

Release point
Release points triggers the envelope to jump to the release point and are represented by making the note thinner. Release envelopes are useful to nicely fade out a note when its release, while preserving other effects like vibrato. There is no point to adding a release point to an instrument that does not have a release envelope.
To set a release point on a note on desktop, simply right-click on a note a choose the "Toggle Release" option. Alternatively, you can hold R and click on a note to toggle a release.
Once a note has a release point, it can be moved by dragging.
On mobile, the release point is toggled by long pressing on a note and selecting "Toggle Release". The default position of a release will be in the middle of the note but you can move it afterwards.

Stop notes
Stop notes simply stop the sound and are displayed as little triangles. Although they are displayed next to the note preceding them, they actually have no pitch or instrument, they simply stop the sound.
To create a stop note on Desktop, right-click on a note and select "Make Stop Note". Alternatively, you can use T+click to create a stop note.
As of FamiStudio 3.0.0 stop notes are no longer needed since they have been replaced by note durations. There are cases where stop notes will still remain when notes are detected to have inconsistent durations, but those should be relatively rare. One use case where they can be useful is to interrupt a long note from a previous pattern.
Instrument Picker
You can make the instrument used by a note the selected instrument by selected "Make Instrument Current" from the note context menu. This is often known as the eye dropper or pipette tool in drawing software.
Alternatively, on desktop, you can hold I and click on a note.

Recording mode
Recording mode is another way to input notes and is enabled by pressing the record button on the toolbar. Recording mode allows inputting notes using a MIDI controller or using a piano-type layout on the QWERTY keyboard. This layout is very similar to what FamiTracker uses. Note that this is not a "real-time" recording mode, simply a note-by-note input mode.
This is default layout for an en-US keyboard. The Configuration Dialog allows re-mapping the keys for other types of keyboards.
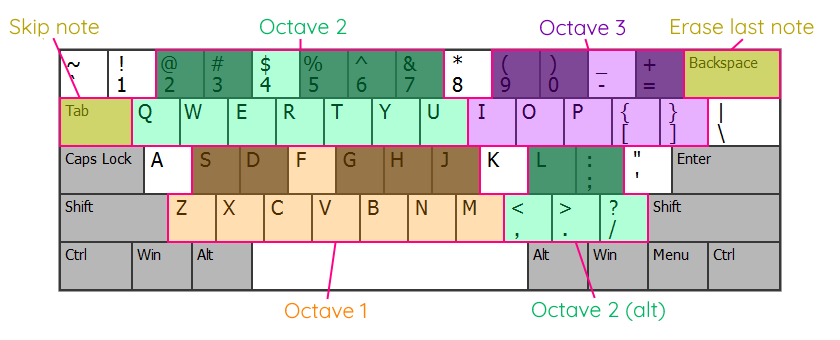
The QWERTY keyboard input will give you a range of approximately 2.5 octaves. By default, this will go from C3 to C5 but it can be moved up/down by pressing Page Up and Page Down. Which keyboard key maps to which piano key will be displayed in the piano roll.

When recording mode is active, the seek bar will turn red. Each note you input will be snapped to the current snap precision (see next section for info about snapping) and the seek bar will advance to the next snapping position.
There are a few other special keys that are enabled when recording mode is activated:
- Backspace: moves back by 1 note (or snapping interval), erasing any note inside the interval.
- Tab: Advances by 1 note (or snapping interval), not recording anything.
- Page Up/Down: Moves the octave range that can be inputted using the QWERTY keyboard up/down.
On mobile, recording mode will automatically pop-up the piano and each note played will be recorded.

Snapping
Snapping help you keep notes aligned to the grid.
It can be toggled by clicking the little magnet in the top-left corner of the piano roll. Shift+S can also be used to quickly toggle snapping on/off.
The precision of the snapping can be changed by right-clicking on the magnet and selecting a different precision. Alternatively, you can rotate the mouse wheel over the magnet.

The snapping precision is expressed in Beats (which are numbered as x.1, x.2, x.3, etc. in the header). So with the default settings, a snapping precision of 1 will mean a quarter note. Adding, selecting and dragging of notes are currently the only actions affected by snapping. More might be added in future based on user feedback.
At any time, when snapping is ON, you can hold Alt to temporarely disable it.
There is also an option to snap effect values. When enabled, newly created effect values in the effect panel will be snapped to the desired precision.
The following keyboard shortcuts can be used to switch between common snapping values:
- Alt+1 : Set snapping to 1 beat.
- Alt+2 : Set snapping to 1/2 beat.
- Alt+3 : Set snapping to 1/4 beat.
- Alt+4 : Set snapping to 1/8 beat.
On mobile, the snapping precision is set from the Quick Access Bar, on the right size but works similarly.

Note attack
By default, notes will have an "attack" which mean they will restart their envelopes (volume, pitch, etc.) from the beginning. This is represented by the little dark rectangle on the left of each note. For FM instruments this mean re-triggering their ADSR envelopes.
The attack can be toggled for a particular note by selecting the "Toggle Attack" option from the note context menu. Alternatively, you can hold A and click on a note to toggle its attack. Similarly, on mobile, toggling the note attack is done by long pressing on a note and selecting "Toggle Attack".
In this example, the first note will have an attack, while the second one will not.

Since envelopes are not reset, this means that if a note was released, it will remain released if the subsequent notes have no attack.
There are a few rules on when attacks can be disabled:
- You can disable the attack if the note uses the same instrument as the previous note.
- You can disable the attack if the instruments are different, but have identical envelopes. This is useful on FM channels (VRC7 or EPSM) to change patch mid-note. Note that N163 does not support this, instruments must be the same.
Failure to follow these rules will display a "hollow" attack, indicating that you broke one of the 2 rules. In the example below, the green instrument did not have identical envelopes. We will be trying to relax these rules further in future versions to allow more use-cases.

Finally, please note that this will generally not carry over to FamiTracker when exporting, besides specific use cases around slide notes.
Slide notes
Slide notes are notes that start at a given pitch (the pitch of the note) and slowly change to hit a target pitch which is represented by where the triangle ends. In this example, the attack of the second note is also disabled.

Slide notes guarantees that the target pitch will be reached by the end of the note (end of the triangle) but this might happen a bit earlier than the visual representation suggests. Especially in the higher pitches. This is due to the fact that the pitch calculations are all integer-based (with 1-bit of fraction) and it is often impossible to get the exact required slope to reach the pitch at the exact time.
To create a slide note, simply select "Toggle Slide Note" from the note context menu and adjust the target note. On desktop, you can also simply hold S, click on a note and drag up/down to create a slide note.
Arpeggios
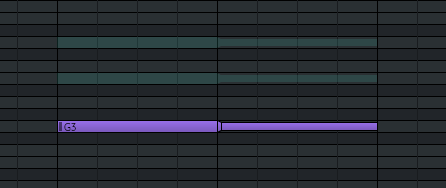
Arpeggios (not to be confused with arpeggio instrument envelopes) are typically used to simulate chords by playing changing notes very rapidly. A note can optionally have an arpeggio associated to it, just like it has an instrument associated to it. When an arpeggio is used, the notes used by this arpeggio will be displayed in a semi-transparent way and the extra notes will take the color of the associated arpeggio. Note that in order to keep things simple, the individual sequence of notes inside the arpeggio will not be displayed.
You can change which arpeggio is associated with a note the same way to can replace an instrument. You can select a new arpeggio and click on an existing note. Or you can select a few notes and drag and drop an arpeggio from the Project Explorer on to the selection.
If an instrument uses an arpeggio envelope and also uses an arpeggio chord, the chord will take over and completely override the arpeggio envelope of the instrument.
Replacing Instruments
To replace the instrument used by a note, you can simply drag the instrument on the note. To replace multiple notes at a time, simply create a selection and drag the instrument on the selection.
To replace just a specific instrument in the selection, you can right click on any note in the selection and the context menu will offer you to replace the note's instrument with the currently selected one.

On mobile, you can replace an instrument or arpeggio by first making a selection, then long pressing on an instrument from the Quick Access Bar, then selecting "Replace Selection Instrument".
For specific instrument replacement, simply long press on a note that is part of a selection to get the content menu.

Copying & pasting notes
Much like the sequencer, selected notes can be copy (or cut) by pressing Ctrl+C (or Ctrl+X). You can then move the selection somewhere else and paste the notes with Ctrl+V.
Copying & pasting notes between projects
It is possible to copy notes from one song to another, or one project to another. When doing so, FamiStudio will first look for possible conflicts such as items (instruments, arpeggios, samples or patterns) with the same names, or missing items. If conflicts are detected, you will have to choose how to resolve those.
More specifically, FamiStudio will be able to identify if the pasted data contains data that is not present in the current project. For example, if you are pasting notes refering to a "Piano" instrument, but no such instrument exist in the project, you will have the option to bring it over in your project.
Also, FamiStudio may detect that some of the items in the pasted data have the same name as existing items, but appear to be different. For example, if you pasting data containing a "Pattern 1", but the current song also has a "Pattern 1", but it does not contain the same exact notes. For each of those, you will be given the option to assume it is the same, or to rename the incoming data and preserve both ("Pattern 1" would be renamed to "Pattern 2" for example, or any number that is not in used).

Special paste
"Special paste" is a more advanced form of pasting. It is used to to do things like pasting notes without their associated effects or volume track (or vice-versa), or to just paste specific effects. You can use a "special paste" by pressing Ctrl+Shift+V. This will open a popup dialog.

-
Mix With Existing Notes : The default behavior of pasting is to completely replace everything by the content of the clipboard. Using the "Mix with existing notes" option will preserve any existing data (notes, volumes, effects) and only insert new data if there is nothing there already.
-
Paste Notes : Will paste the actual notes (including slide notes and arpeggio information).
-
Paste Effects : You can choose the list of effect that you with to paste. Unchecked effect will not be pasted.
-
Repeat : You can repeat the same paste operation multiple times to quickly repeat a sequence of note/effect values multiple times. The start of the next paste will be where the last one ended.
On mobile, the same functionality is accessible by long pressing on the "Paste" icon of the toolbar. The dialog will look different by contains the same functionality.

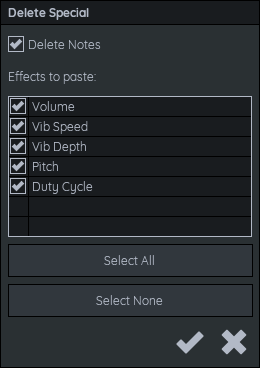
Special delete
Much like Special paste, "Special delete" is a more advanced form of deletion. You can bring up the special delete dialog by selecting a range of notes and pressing Ctrl+Shift+Delete.
-
Delete Notes : If checked, will delete all the selected notes.
-
Delete Effects : You can choose here the list of effects to delete. All unchecked effects will be preserved. The start of the next paste will be where the last one ended.
On mobile, the same functionality is accessible by long pressing on the "Delete" icon of the toolbar. The dialog will look different by contains the same functionality.

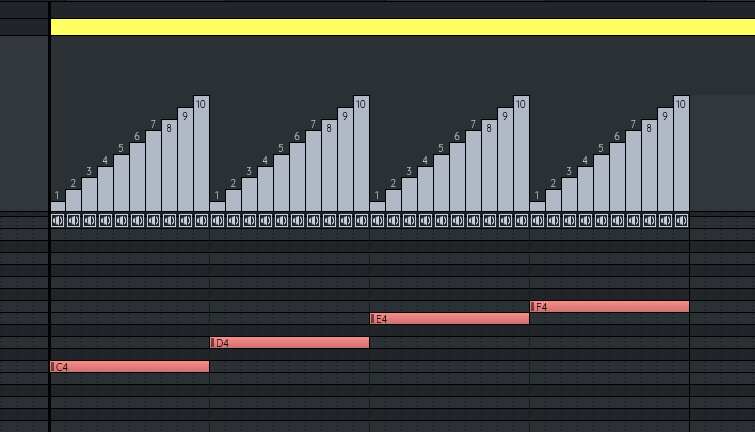
Editing Effects
The effect panel can be opened by clicking the little triangle at the top-left of the piano roll. On mobile you select the effect you want to edit using the Quick Access Bar when in the Piano Roll.
Effects are edited by selecting and effect and dragging up or down to change the value. Double-clicking on an effect value deletes it. For effects that have huge values (such as FDS Depth), they may change in a logarithmic way. You can also hold Shift to fine tune the exact value (a movement of 1 pixel will change the value by 1).
Here are all the effects that are supported, note that not every effect is available on every channel. Some are even specific to certain expansions or tempo modes.
Volume
The volume tracks dictates how loud the current channel should play. This volume is combined with volume envelope by multiplication (50% volume track x 50% envelope volume = 25% total volume). It is much more efficient to use volume envelopes wherever possible and only use volume tracks to control the global volume of the song.
The volume track is allowed to have slides to smoothly raise or lower the volume.
Volume slides are created exactly like regular slide notes, by either using the context menu that appears by right-clicking on an effect value or by holding S, clicking on effect values and dragging up or down.
These slides use fixed point arithmetic and have limited precision. They will go up/down by 1 volume unit every 16 frames at most. Very slow/long slides may end earlier than their visual representation.
On mobile, a volume slide is created by long pressing on a volume value and selecting "Toggle Volume Slide".

Vibrato Depth & Speed
Vibrato depth and speed are used to add vibrato to a portion of the song without having to bother creating a new instrument. Please note that vibrato will temporarily override any pitch envelope on the current instrument. When vibrato is disabled (by setting depth or speed, or both to zero), the instrument will essentially have no pitch envelope until a new note is played.
The depth values for the vibrato are identical to FamiTracker but the speeds are slightly different. Please see the Export page for a table that maps between FamiStudio and FamiTracker.
In its current implementation, changing the speed/depth of the vibrato is likely to result in a "pop" since it will restart the vibrato envelope, a sine wave, from the start. That being said, if you want to do it, it is possible if you carefully take the number of frames of a full cycle into account and change it at the exact right time. It will be tedious to setup, but it can be done.
Here is a table the period (in frame) for each value of the vibrato speed effect.
| Vibrato Speed | Period (in frames) |
|---|---|
| 1 | 64 |
| 2 | 32 |
| 3 | 21 |
| 4 | 16 |
| 5 | 13 |
| 6 | 11 |
| 7 | 9 |
| 8 | 8 |
| 9 | 7 |
| 10 | 6 |
| 11 | 5 |
| 12 | 4 |
For example, if you start a vibrato at speed 5, you can change it seamlessly every 13 frame since you will be at the beginning of the cycle.
Pitch
Controls the global pitch of the track. Can be used to make an entire channel slightly out of tune.
Duty Cycle
Allow changing the duty cycle of an instrument without using a duty cycle envelope. This can only affect instruments with no duty cycle envelopes. This effect is mostly just there for compatibility with FamiTracker. Unless you have special cases where you often need to change the duty cycle, you should always favor creating different instruments instead of using this effect.
Speed
This changes the speed parameter of the FamiTracker tempo settings and is only available in FamiTracker tempo mode. Larger values will make the song scroll slower. Please refer to the Editing Songs & Project section for more information about tempo management.
Note and Cut delay
Note delays allows delaying the moment a note is played by a few frames while cut delay will stop a note after a few frames. This also is only available in FamiTracker tempo mode. Please refer to the Editing Songs & Project section for more information about tempo management.
DAC (DPCM channel only)
Unique to the DPCM channel, can be used to manually set the current DAC value. Can be usefull to artifically create "pop" sounds without any samples or to slightly affect the volume of the noise/triangle channels due to the non-linear mixing of the NES/Famicom.
Phase Reset
On supported channels, will reset the phase if this effect is present. Can be used to make sure 2 channels have their waveform perfectly aligned and create creative/destructive interference. Note that is recommended to use the Fully emulate when seeking option when working with phase reset. Phase resets are extremely time sensitive and may not sound exactly the same in-app and on real hardware/emulators, and the exact timing may even change in future versions.
FDS Modulation Speed / Depth (FDS expansion only)
These are only available when using the FDS audio expansion. These can be used to change the modulation speed/depth. Note that instruments that use Auto-Modulation cannot have their speed changed manually.
Also, instrument will contantly reset their modulation speed/depth to the values of the instrument on every note with an attack. In other words, it will loose its effect on every note attack and will need to be re-set to override the instrument.
Env Period (Sunsoft 5B and EPSM squares only)
Controls the pitch/period of the envelope for instruments that have it enabled and dont use the Auto-Pitch feature. Note that since envelope is shared accross all 3 channel, this effect may have impact on the other square channels.
Also, instrument with envelope enabled will contantly reset the envelope frequency to the values of the instrument on every note with an attack. In other words, it will loose its effect on every note attack and will need to be re-set to override the instrument.
Speed (Famitracker-Tempo only)
Changes the "speed" parameter of the FamiTracker tempo.
Note Delay and Cut Delay (Famitracker-Tempo only)
These 2 effects are used to offset note starts and end respectively, by a specific number of frames. This is the main way to achieve frame granularity when using FamiTracker tempo. For example, a note delay of 2 will trigger that note 2 frames later than normal.